All of our Themes are able to be translated into any language. The process of translating the theme is user responsibility. The following instructions are given as guidance.
nnnn
Open wp-config.php and replace this: define ('WPLANG', ''); with this (substitute the language string (bg_BG) with your own!): define ('WPLANG', 'bg_BG');
There are 3 methods to update WordPress themes to the newer version. These new updates are essential if you want to have a bug-free website as we give new features and improvements to the theme over time. Some of these updates might be needed to make the theme compatible with WordPress’s newer versions. There is no risk of losing your settings and pages.
nnnn
However if you had done modifications in parent theme files, then they will be lost. We recommend you to do all your modifications using the Child theme of Docly (the child theme included with the theme package).
nnnn
Update Using FTP
nnnnnnnn
Login in to your Themeforest account and go to downloads (Dashboard > downloads)
Download the theme into your computer
Install an FTP program (Filezilla is free)
Retrieve your FTP login information from your hosting admin panel and login into your hosting via FTP
Unzip the item main file
Locate the docly.zip file and unzip it. Make sure your unzipping software does not create an extra directory with the same name nested into each other.
Drag and drop the theme main folder into your FTP program with the destination: “YOUR_HOSTING_ROOT/YOUR_SUBDIRECTORY/wp-content/themes/”
FTP program will give a warning that there is an existing with the same directory name, choose to replace all.
It will take varying from 15 to 30 minutes to replace all files. once you did login into your WordPress dashboard and go to master key settings. on the header (besides the master key logo) the theme version will be changed to the latest version. this is the indication that your theme is updated. We recommend method one which only takes less than one minute.
nnnn
Note: You can also upload the new version of the theme to “YOUR_HOSTING_ROOT/YOUR_SUBDIRECTORY/wp-content/themes/” directory with cPanel File Manager. Make sure every time that, you have replaced the old theme with the new version of the theme.
nnnn
Auto Update using Envato WordPress Toolkit
nnnn
Go to themeforest.net > Settings > APIKeys.
Generate an API key and store it in a text file as you will need it shortly.
Now login into your WordPress admin dashboard
From the left sidebar click on Envato Toolkit (If you have not installed it yet read the Plugins Installation section of this documentation)
As shown below screenshot type your username and fill in the API key that you just retrieved from themeforest.net
Save Settings.
Once the page refreshed you should see the list of themes you have purchased.
If there is a new version available you will get the “update Automatically link.
Once clicked, the theme will be updated to the most recent version.
nnnn
Update Through WordPress Admin Panel
nnnn
Navigate to Appearance > Themes Activate another theme to deactivate the theme
Delete the installed the theme
Unzip the file you just downloaded from ThemeForest and locate the WordPress Theme docly.zip
Still within the Themes section, on the header tab, click on “Install Themes”, then on the header second tab click “Upload”.
Click “Browse…” and locate the new theme file docly.zip
In the “Upgrade existing theme?” option choose “Yes” from the dropdown list.
Click “Install Now”.
Click “Activate”.
nnnn
Please note that before updating a theme, we recommend you make a backup of your modified files. Also, we recommend deactivating its current version and then upload the zip file with the new theme version then activate and update the theme.
nnnn
After Update
nnnn
Generally, with every update of the theme there an updated version of the Docly Core plugin required. You must have to install that plugin to get all the changes, improvements that we enlist in the version changelogs. Navigate the Appearance > Install Plugins to check if there updates available for the plugins. Update the Docly Core plugin from there if update available.
Set It And Forget It. Theme Options Are Global Settings That Affect The Entire Site. This section will provide you an in-depth guide on how to use Theme Settings.
nnnn
The Theme Settings allow you to easily make site-wide changes. They are built to interact with every element on the site so you can quickly modify elements and have it populate across every page and post.
nnnn
You can control the theme’s functionality and customize the content from the Theme Settings page. Here you will find all the relevant settings to customize the theme.
nnnn
To access the Theme Settings page, go to Dashboard > Theme Settings.You will find this page at the top of the Appearance menu
Ama Page Options get even more interesting in the creative process. These are a set of options that can be used on every single page or post, and will only affect the individual page you use them on.
nnnn
Need one page to have a different background or different header layout than other pages? No problem, Ama Page Options to the rescue!
nnnn
Page Options Override Theme Options To Allow Extreme Control Over Each Page Or Post. Theme Settings are global, page options are individual. This setup gives you amazing creative flexibility that becomes indispensable when you start creating your site. Having the option to freely choose how individual pages are styled is incredible freedom.
nnnn
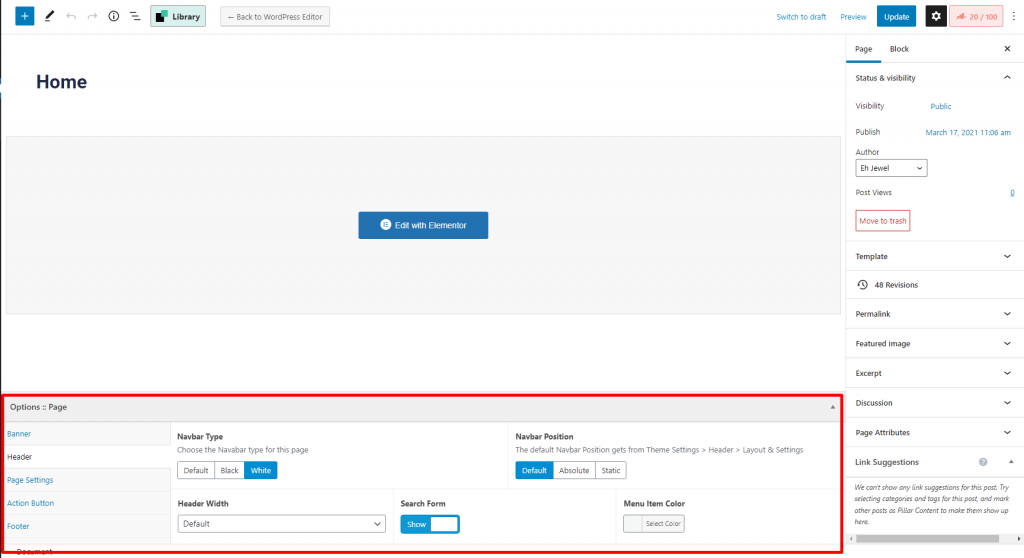
For example, you can choose an individual logo or header style for a specific page only from Ama Page Options. You can find the Page Options at the bottom of the WordPress page editor.
If you want your site to look like exactly the ‘Ama’ demos, you have to import the demo content. We integrated the One Click Demo installation feature in Ama. You can import the demo content by a click only.
n
Install the theme and activate it. Then install all the required plugins. Make sure all the required plugins are activated before you begin. Then navigate to “Appearance > Import Demo Data” to import the demo data and click on the “Import Demo Data” button.
n
After Demo Import
n
After successfully importing the demo content, you will find all the pages in your WordPress admin dashboard’s Pages menu. Find your desired homepage there and start editing this page with Elementor. Also, you can set your Homepage demo as the Frontpage of your website from Settings > Reading.
n
An alternative method
n
However, you will get all demo content data with the theme package. You will find the demos in ama>inc>demos this path. If you failed to import the demo content with one click then you have to follow the below steps to import the demo content manually.
n
n n
Navigate to Tools > Importthen install the WordPress plugin and click on the ‘Run Importer’. Upload here the ‘contents.xml’ file.
n
Install the ‘Widget Importer & Exporter‘ plugin to import the demo widgets. Then navigate to Tools > Widget Importer & Exporter and upload here the ‘widgets.wie’ file.
n
Now you have to import the Theme Settings as like the demo. Navigate to ‘Theme Settings > Import / Export‘. Then click on the Import from File button and copy-paste the backup string here and click on the Import a Backup button. You will find the backup string in the settings.json file.
After activating the Ama WordPress theme, you will see a message that tells you to install some required and recommended plugins, click on Begin Installing Plugins, or if you can’t see that message, Go to Appearance > Install plugins and start installing all the plugins
nnnn
Next step select all the plugins and change the drop-down menu to Install then click on the Apply button and wait for the installation process.
nnnn
After installing plugins you will redirect to the plugins list, again select all the plugins and change drop down this time to Activate and click on Apply button then wait for the activation process.
nnnn
Here are the list of the required and recommended plugins for the theme.
nnnn
Ama Core is the plugin that we built for the theme. The Elementor widgets, WordPress custom widgets & other features developed in this plugin.
Elementor: The Elementor page builder plugin is used to build the page elements. You can easily build the theme elements by drag & drop with this plugin.
bbPress:bbPress is used to build the Forum part of the theme. That means bbPress is required if you want to use the Forum feature in the theme. bbPress is intentionally simple yet infinitely powerful free forum software in the market.
weDocs plugin is integrated for creating and maintaining knowledge base articles. You can host docs inside your WordPress, create/add new docs, organize with ordering, tags and even fetch docs from external sites using this plugin. This plugin is extremely handy for delivering long and detailed documentation of your WordPress product/plugin by bundling this with it. weDocs makes browsing and creating documentation a fresh and streamlined experience within the familiarity of your WP environment.
nnnn
Redux Framework plugin is used to create the Theme Settings page. Notable that, we slightly modified this plugin to add some extra features.
Advanced Custom Fields-pro is a premium plugin that bundled with the theme & used to create the Page Options
One Click Demo Import: You can easily import the theme demo with the One Click Demo Importplugin. We integrated this plugin for easy importing the theme demo.
Contact Form 7 is used to create contact forms on the theme demo. This plugin can manage multiple contact forms.