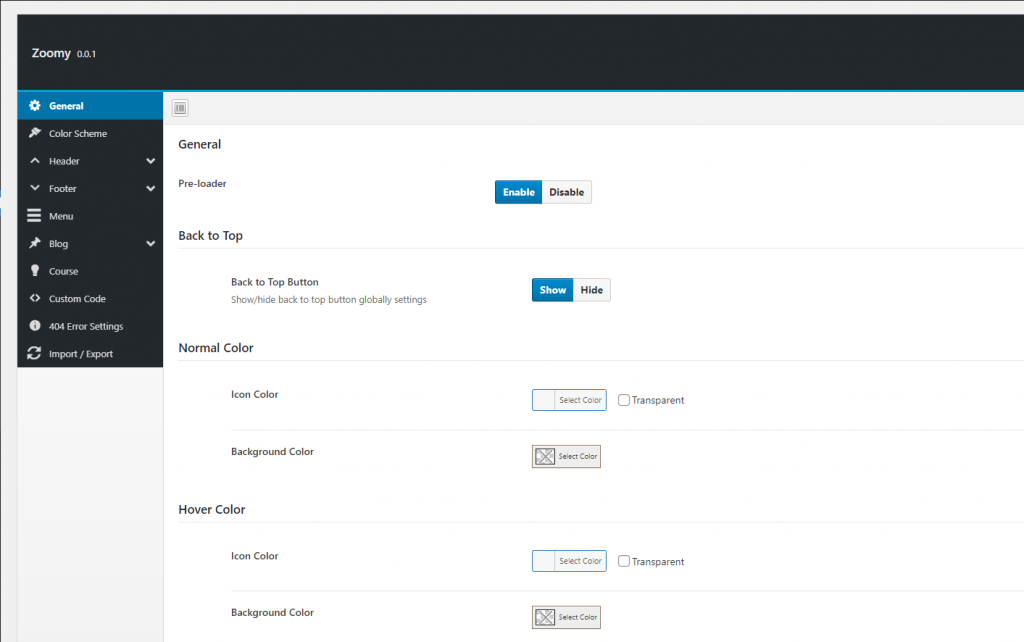
Set It And Forget It. Theme Options Are Global Settings That Affect The Entire Site. This section will provide you an in-depth guide on how to use Theme Settings.
nnnn
The Theme Settings allow you to easily make site-wide changes. They are built to interact with every element on the site so you can quickly modify elements and have it populate across every page and post.
nnnn
You can control the theme’s functionality and customize the content from the Theme Settings page. Here you will find all the relevant settings to customize the theme.
nnnn
To access the Theme Settings page, go to Dashboard > Theme Settings.You will find this page at the top of the Appearance menu
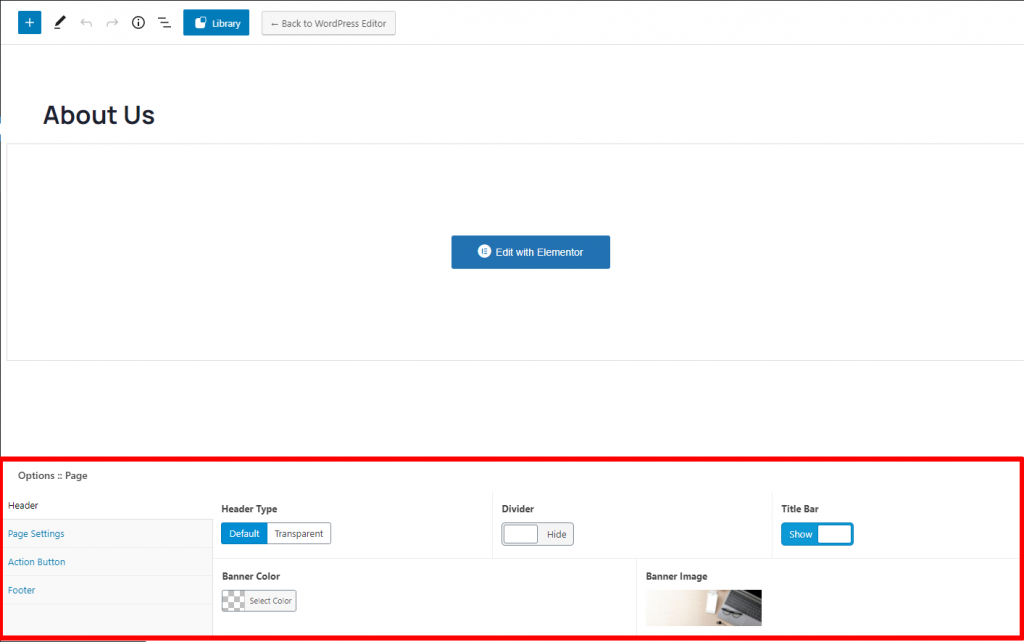
Zoomy Page Options get even more interesting in the creative process. These are a set of options that can be used on every single page or post, and will only affect the individual page you use them on.
nnnn
Need one page to have a different background or different header layout than other pages? No problem, Zoomy Page Options to the rescue!
nnnn
Page Options Override Theme Options To Allow Extreme Control Over Each Page Or Post. Theme Settings are global, page options are individual. This setup gives you amazing creative flexibility that becomes indispensable when you start creating your site. Having the option to freely choose how individual pages are styled is incredible freedom.
nnnn
For example, you can choose an individual logo or header style for a specific page only from Zoomy Page Options. You can find the Page Options at the bottom of the WordPress page editor.
If you want your site to look like exactly the ‘Zoomy’ demos, you have to import the demo content. We integrated the One Click Demo installation feature in Zoomy. You can import the demo content by a click only.
Install the theme and activate it. Then install all the required plugins. Make sure all the required plugins are activated before you begin. Then navigate to “Appearance > Import Demo Data” to import the demo data and click on the “Import Demo Data” button.
n
After Demo Import
n
After successfully importing the demo content, you will find all the pages in your WordPress admin dashboard’s Pages menu. Find your desired homepage there and start editing this page with Elementor. Also, you can set your Homepage demo as the Frontpage of your website from Settings > Reading.
n
An alternative method
n
However, you will get all demo content data with the theme package. You will find the demos in Zoomy>inc>demos this path. If you failed to import the demo content with one click then you have to follow the below steps to import the demo content manually.
n
n n
Navigate to Tools > Importthen install the WordPress plugin and click on the ‘Run Importer’. Upload here the ‘contents.xml’ file.
n
Install the ‘Widget Importer & Exporter‘ plugin to import the demo widgets. Then navigate to Tools > Widget Importer & Exporter and upload here the ‘widgets.wie’ file.
n
Now you have to import the Theme Settings as like the demo. Navigate to ‘Theme Settings > Import / Export‘. Then click on the Import from File button and copy-paste the backup string here and click on the Import a Backup button. You will find the backup string in the settings.json file.
After activating the Zoomy WordPress theme, you will see a message that tells you to install some required and recommended plugins, click on Begin Installing Plugins, or if you can’t see that message, Go to Appearance > Install plugins and star install all the plugins
nnnn
Next step select all the plugins and change the drop-down menu to Install then click on the Apply button and wait for the installation process.
nnnn
After installing plugins you will redirect to the plugins list, again select all the plugins and change drop down this time to Activate and click on Apply button then wait for the activation process.
nnnn
Here are the list of the required and recommended plugins for the theme.
nnnn
Zoomy Core: is the plugin that we built for the theme. The Elementor widgets, WordPress custom widgets & other features developed in this plugin.
Elementor: The Elementor page builder plugin is used to build the page elements. You can easily build the theme elements by drag & drop with this plugin.
WordPress LMS Plugin: LearnPress is a comprehensive WordPress LMS Plugin for WordPress. This is one of the best WordPress LMS Plugins which can be used to easily create & sell courses online. You can create a course curriculum with lessons & quizzes included which is managed with an easy-to-use interface for users. Having this WordPress LMS Plugin, now you have a chance to quickly and easily create education, online school, online-course websites with no coding knowledge required.
LearnPress Wishlist: LearnPress Wishlist bring wishlist feature for LearnPress. It allows you to add your favorite course to a list to take later. We have created the LearnPress WordPress LMS plugin with add-ons structure in mind as well as keeping it as lightweight as possible, so together with other add-ons, Wishlist will help to complete LearnPress much more. Check out other add-ons for LearnPress below.
LearnPress Course Review: LearnPress Course Review, bring review feature to your course. Now, student can rate and give review for the course they take on a LearnPress site
Redux Framework plugin is used to create the Theme Settings page. Notable that, we slightly modified this plugin to add some extra features.
Advanced Custom Fields-pro is a premium plugin that bundled with the theme & used to create the Page Options
One Click Demo Import: You can easily import the theme demo with the One Click Demo Importplugin. We integrated this plugin for easy importing the theme demo.
Contact Form 7 is used to create contact forms on the theme demo. This plugin can manage multiple contact forms.
nnnn
If you faced any problem or couldn’t install plugins, feel free to open a support ticket.
Extract the zipped package downloaded from ThemeForest to your desktop, in the extracted package you will find the zoomy.zip (zoomy_version.zip) file which is the WordPress theme.
nnnn
You can install the theme in two ways:
nnnn
Upload Method
nnnn
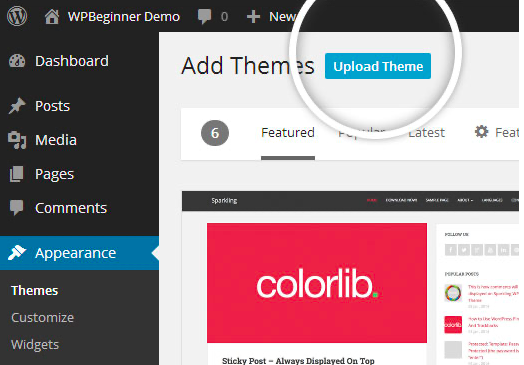
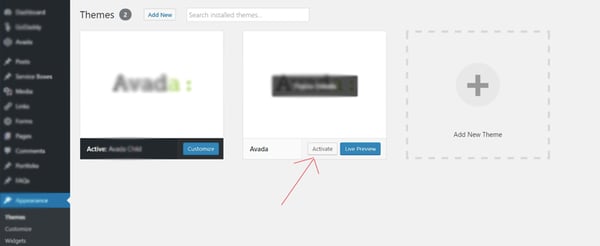
1. Navigate to Appearance > Themes.
nnnn
Log in to your WordPress dashboard and go to Appearance in the menu on the left of the dashboard and select Themes.
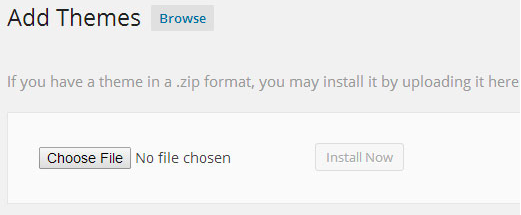
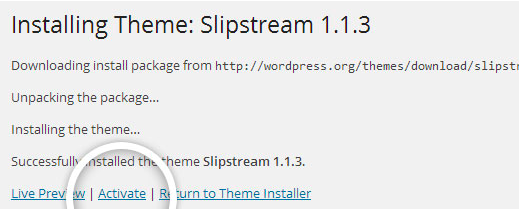
After clicking Install, a message will appear that the theme installation was successful. Click Activate to make the theme live on your website.
nnnnnnnn
FTPMethod
nnnn
If you can not install the theme by following the above method, you can try this method.
nnnn
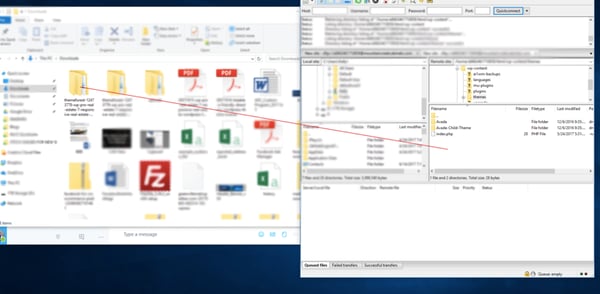
1. Download FTP Client to your computer.
nnnn
To begin this process, you will need to download an FTP Client to your computer. This is a software tool that allows you to access and add or delete files on your website server.
nnnn
2. Create an FTP account through your hosting provider.
nnnn
Next, you’ll need to gain access to your hosting provider account through the FTP Client. Usually, you will have to set up your own FTP user account within your hosting dashboard, however, it is a different process for every hosting provider. Typically, the hosting provider gives you a username and password when you make a new account, which you’ll need when creating your FTP Client account.
nnnn
3. Download your theme and unzip the file.
nnnn
If you don’t already have your theme file downloaded to your computer, download it now. Certain companies provide more in the download folder than you need to upload your theme, so be sure to just download the .zip file. Once you’ve downloaded your files, you’ll need to unzip and compress your file. You can do this by simply right-clicking the .zip file, then selecting Extract.
nnnn
4. Upload the theme folder to WordPress to install.
nnnn
Within the FTP Client, find the root of your WordPress install. Next, go into the wp-content folder, and select Themes. Upload the entire folder you unzipped here.
5. Activate the theme from your WordPress dashboard.
nnnn
After uploading the theme, you have to activate it. Navigate to [direction]Appearance > Themes[/direction] page to activate the theme. You should see your new theme as an option under your downloaded themes. Select the new theme and click Activate to make the theme live on your website.
Zoomy is clean, modern and unique WordPress Theme that has beautiful design and unique features. This will be the best suited for your educational purpose website like university, college, school, kindergarten, online courses, blog, academy, courses, education, education center, tuition, tutoring, business, institute, learning, teacher and much more. This Theme is suitable for Education Course Learning Management System website. It has a fully responsive layout. It fits perfectly on various displays and resolutions from regular desktop screens to tablets, iPads, iPhones and small mobile devices.
Extract the zipped package downloaded from ThemeForest to your desktop, in the extracted package you will find the docy.zip (docy_version.zip) file which is the WordPress theme.
nnnn
You can install the theme in two ways:
nnnn
Upload Method
nnnn
1. Navigate to Appearance > Themes.
nnnn
Log in to your WordPress dashboard and go to Appearance in the menu on the left of the dashboard and select Themes.
After clicking Install, a message will appear that the theme installation was successful. Click Activate to make the theme live on your website.
nnnnnnnn
FTPMethod
nnnn
If you can not install the theme by following the above method, you can try this method.
nnnn
1. Download FTP Client to your computer.
nnnn
To begin this process, you will need to download an FTP Client to your computer. This is a software tool that allows you to access and add or delete files on your website server.
nnnn
2. Create an FTP account through your hosting provider.
nnnn
Next, you’ll need to gain access to your hosting provider account through the FTP Client. Usually, you will have to set up your own FTP user account within your hosting dashboard, however, it is a different process for every hosting provider. Typically, the hosting provider gives you a username and password when you make a new account, which you’ll need when creating your FTP Client account.
nnnn
3. Download your theme and unzip the file.
nnnn
If you don’t already have your theme file downloaded to your computer, download it now. Certain companies provide more in the download folder than you need to upload your theme, so be sure to just download the .zip file. Once you’ve downloaded your files, you’ll need to unzip and compress your file. You can do this by simply right-clicking the .zip file, then selecting Extract.
nnnn
4. Upload the theme folder to WordPress to install.
nnnn
Within the FTP Client, find the root of your WordPress install. Next, go into the wp-content folder, and select Themes. Upload the entire folder you unzipped here.
5. Activate the theme from your WordPress dashboard.
nnnn
After uploading the theme, you have to activate it. Navigate to [direction]Appearance > Themes[/direction] page to activate the theme. You should see your new theme as an option under your downloaded themes. Select the new theme and click Activate to make the theme live on your website.