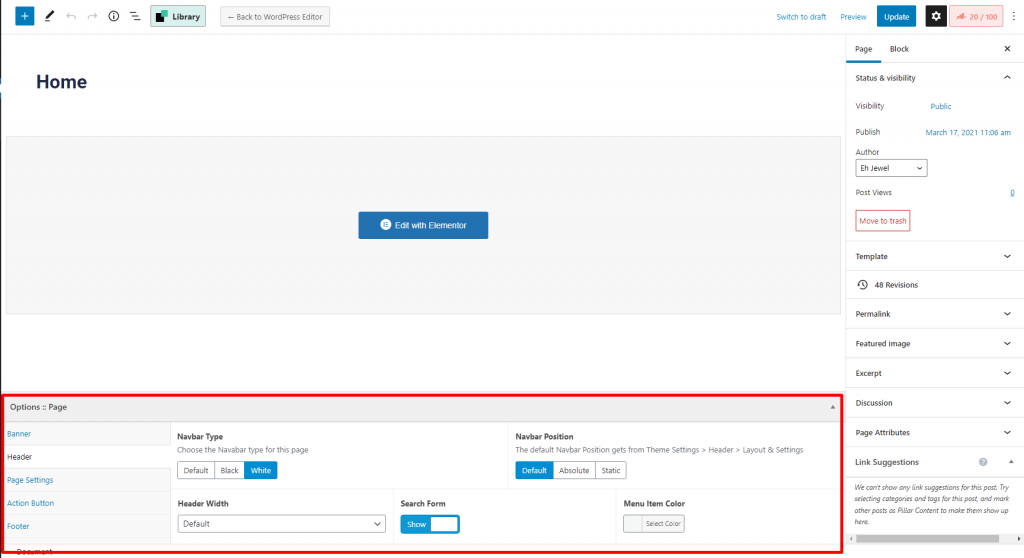
Docy Page Options get even more interesting in the creative process. These are a set of options that can be used on every single page or post, and will only affect the individual page you use them on.
nnnn
Need one page to have a different background or different header layout than other pages? No problem, Docy Page Options to the rescue!
nnnn
Page Options Override Theme Options To Allow Extreme Control Over Each Page Or Post. Theme Settings are global, page options are individual. This setup gives you amazing creative flexibility that becomes indispensable when you start creating your site. Having the option to freely choose how individual pages are styled is incredible freedom.
nnnn
For example, you can choose an individual logo or header style for a specific page only from Docy Page Options. You can find the Page Options at the bottom of the WordPress page editor.
If you want your site to look like exactly the ‘Docy’ demos, you have to import the demo content. We integrated the One Click Demo installation feature in Docy. You can import the demo content by a click only.
Install the theme and activate it. Then install all the required plugins. Make sure all the required plugins are activated before you begin. Then navigate to “Appearance > Import Demo Data” to import the demo data and click on the “Import Demo Data” button.
n
After Demo Import
n
After successfully importing the demo content, you will find all the pages in your WordPress admin dashboard’s Pages menu. Find your desired homepage there and start editing this page with Elementor. Also, you can set your Homepage demo as the Frontpage of your website from Settings > Reading.
n
An alternative method
n
However, you will get all demo content data with the theme package. You will find the demos in docy>inc>demos this path. If you failed to import the demo content with one click then you have to follow the below steps to import the demo content manually.
n
n n
Navigate to Tools > Importthen install the WordPress plugin and click on the ‘Run Importer’. Upload here the ‘contents.xml’ file.
n
Install the ‘Widget Importer & Exporter‘ plugin to import the demo widgets. Then navigate to Tools > Widget Importer & Exporter and upload here the ‘widgets.wie’ file.
n
Now you have to import the Theme Settings as like the demo. Navigate to ‘Theme Settings > Import / Export‘. Then click on the Import from File button and copy-paste the backup string here and click on the Import a Backup button. You will find the backup string in the settings.json file.
nn
n
Tips
n
Clean your WordPress site before reinstalling a Demo. You can clean your WordPress with the WP Reset plugin.
After activating the Docy WordPress theme, you will see a message that tells you to install some required and recommended plugins, click on Begin Installing Plugins, or if you can’t see that message, Go to Appearance > Install plugins and star install all the plugins
nnnn
Next step select all the plugins and change the drop-down menu to Install then click on the Apply button and wait for the installation process.
nnnn
After installing plugins you will redirect to the plugins list, again select all the plugins and change the drop-down this time to Activate and click on Apply button then wait for the activation process.
nnnn
Here is the list of the required and recommended plugins for the theme.
nnnn
Docy Core is the plugin that we built for the theme. The Elementor widgets, WordPress custom widgets & other features developed in this plugin.
Elementor: The Elementor page builder plugin is used to build the page elements. You can easily build the theme elements by drag & drop with this plugin.
Pro Elements for Elementor: Docy integrates seamlessly both with Elementor Pro and its free alternative PRO Elements. No need to install bulky third-party add-ons or plugins.
bbPress:bbPress is used to build the Forum part of the theme. That means bbPress is required if you want to use the Forum feature in the theme. bbPress is intentionally simple yet infinitely powerful free forum software in the market.
weDocs plugin is integrated for creating and maintaining knowledge base articles. You can host docs inside your WordPress, create/add new docs, organize with ordering, tags and even fetch docs from external sites using this plugin. This plugin is extremely handy for delivering long and detailed documentation of your WordPress product/plugin by bundling this with it. weDocs makes browsing and creating documentation a fresh and streamlined experience within the familiarity of your WP environment.
Redux Framework plugin is used to create the Theme Settings page. Notable that, we slightly modified this plugin to add some extra features.
Advanced Custom Fields-pro is a premium plugin that bundled with the theme & used to create the Page Options
One Click Demo Import: You can easily import the theme demo with the One Click Demo Importplugin. We integrated this plugin for easy importing the theme demo.
Contact Form 7 is used to create contact forms on the theme demo. This plugin can manage multiple contact forms.
nnnn
If you face any problems or couldn’t install plugins, feel free to open a support ticket.
Extract the zipped package downloaded from ThemeForest to your desktop, in the extracted package you will find the ama.zip (ama_version.zip) file which is the WordPress theme.
nnnn
You can install the theme in two ways:
nnnn
Upload Method
nnnn
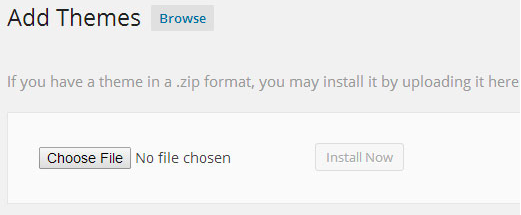
1. Navigate to Appearance > Themes.
nnnn
Log in to your WordPress dashboard and go to Appearance in the menu on the left of the dashboard and select Themes.
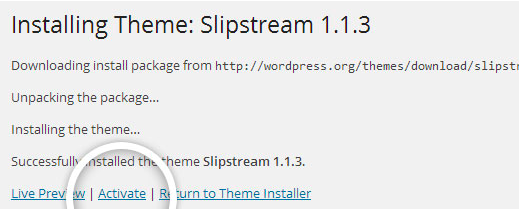
After clicking Install, a message will appear that the theme installation was successful. Click Activate to make the theme live on your website.
nnnnnnnn
FTPMethod
nnnn
If you can not install the theme by following the above method, you can try this method.
nnnn
1. Download FTP Client to your computer.
nnnn
To begin this process, you will need to download an FTP Client to your computer. This is a software tool that allows you to access and add or delete files on your website server.
nnnn
2. Create an FTP account through your hosting provider.
nnnn
Next, you’ll need to gain access to your hosting provider account through the FTP Client. Usually, you will have to set up your own FTP user account within your hosting dashboard, however, it is a different process for every hosting provider. Typically, the hosting provider gives you a username and password when you make a new account, which you’ll need when creating your FTP Client account.
nnnn
3. Download your theme and unzip the file.
nnnn
If you don’t already have your theme file downloaded to your computer, download it now. Certain companies provide more in the download folder than you need to upload your theme, so be sure to just download the .zip file. Once you’ve downloaded your files, you’ll need to unzip and compress your file. You can do this by simply right-clicking the .zip file, then selecting Extract.
nnnn
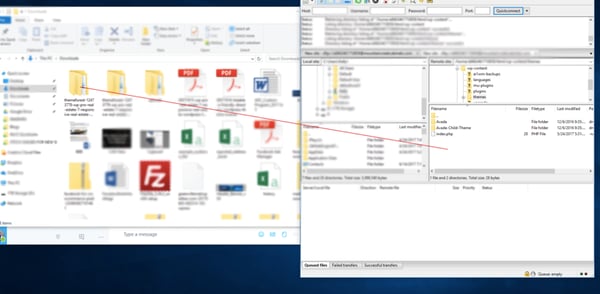
4. Upload the theme folder to WordPress to install.
nnnn
Within the FTP Client, find the root of your WordPress install. Next, go into the wp-content folder, and select Themes. Upload the entire folder you unzipped here.
5. Activate the theme from your WordPress dashboard.
nnnn
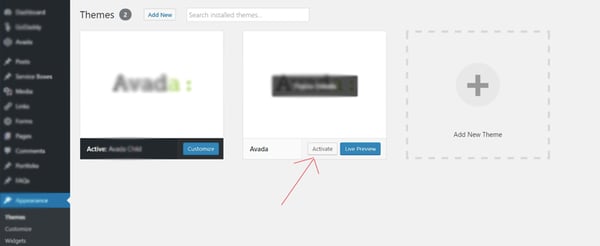
After uploading the theme, you have to activate it. Navigate to [direction]Appearance > Themes[/direction] page to activate the theme. You should see your new theme as an option under your downloaded themes. Select the new theme and click Activate to make the theme live on your website.
Docy is a powerful, responsive, and high-performance online documentation WordPress theme that can assist you quickly develop your next product’s documentation. It can be used for documenting API, frameworks, plugins, templates, software manuals, etc.