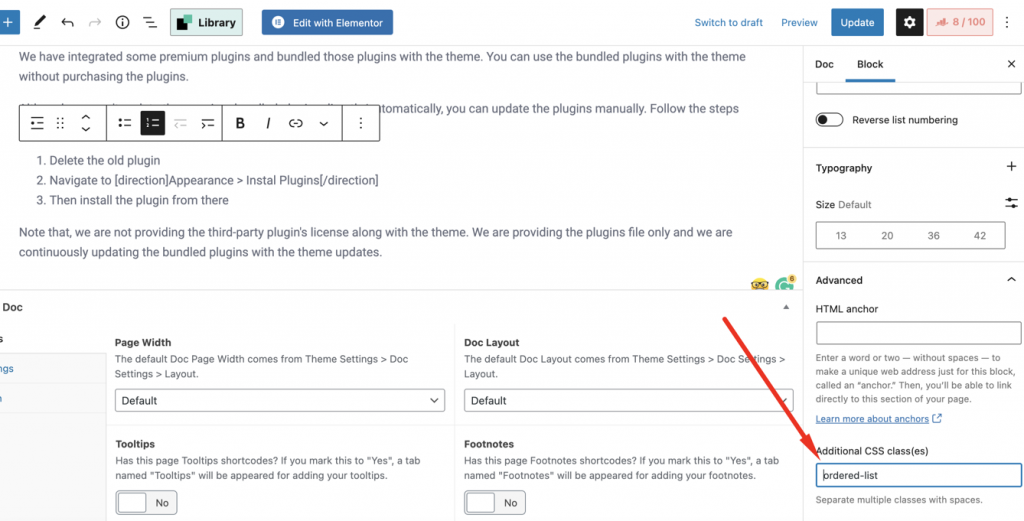
You can use the theme’s list style with the Gutenberg list block. You just need to input the ordered-list class name in the Additional CSS class(es) field. See the screenshot below to look at where to input the class.
All of our Themes are able to be translated into any language. The process of translating the theme is user responsibility. The following instructions are given as guidance.
nnnn
Open wp-config.php and replace this: define ('WPLANG', ''); with this (substitute the language string (bg_BG) with your own!): define ('WPLANG', 'bg_BG');
Optimizing your images will helps your WordPress site load faster.
nnnn
Download and activate WP Smush.it This plugin will optimize every image you upload and you can use the Bulk Smush.it feature to smush all of your uploaded images.
nnnn
Alternatives to WP Smush.it include EWWW Image Optimizer, CW Image Optimizer, Imsanity and Hammy. Many WordPress users prefer using these plugins as they do not rely on an external server to process your images.
There are 3 methods to update WordPress themes to the newer version. These new updates are essential if you want to have a bug-free website as we give new features and improvements to the theme over time. Some of these updates might be needed to make the theme compatible with WordPress’s newer versions. There is no risk of losing your settings and pages.
nnnn
However if you had done modifications in parent theme files, then they will be lost. We recommend you to do all your modifications using the Child theme of Docy (the child theme included with the theme package).
nnnn
Auto Update
nnnn
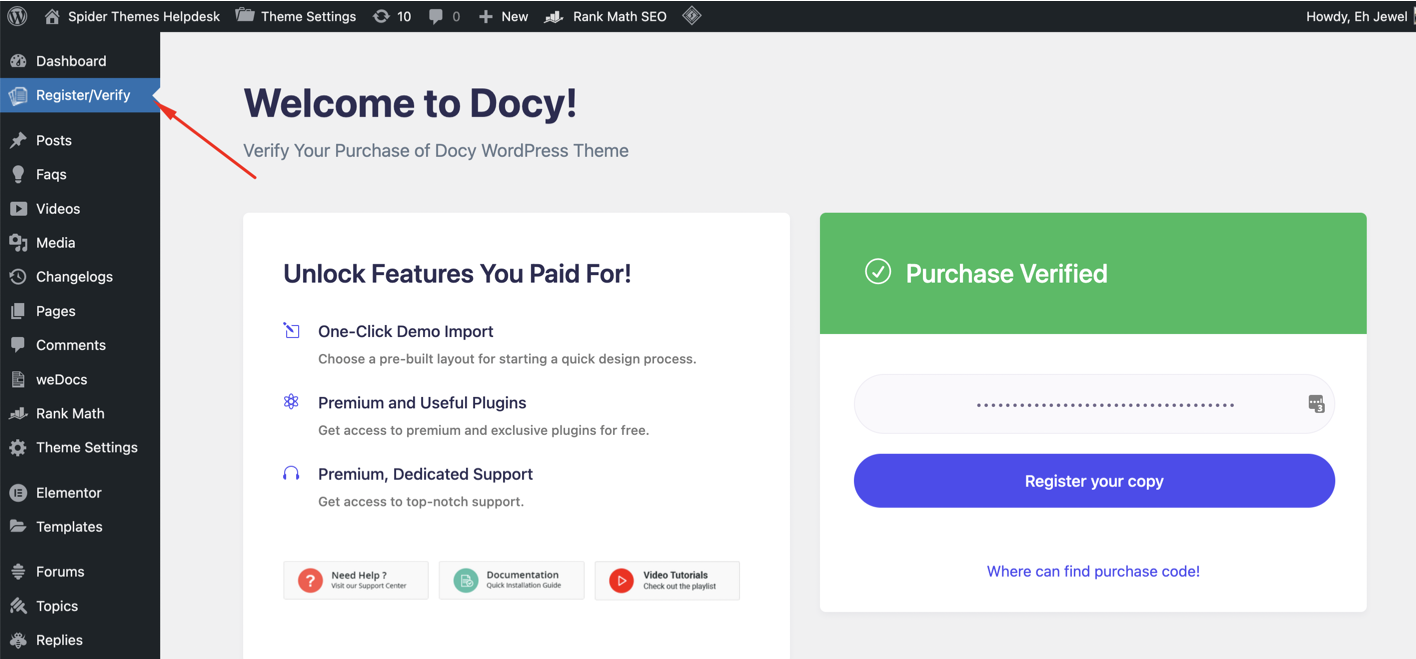
To get the automatic update of the theme on your WordPress dashboard, you have to register/verify the theme with the Envato purchase code. Navigate to Register/Verify page from the WordPress admin dashboard.
nnnnnnnn
After successfully verifying the purchase code, you will get an update notice for updating the theme. Navigate to [direction] Appearance > Themes [/direction] to see if new update available there.
nnnnUpdate Available for WordPress Themennnn
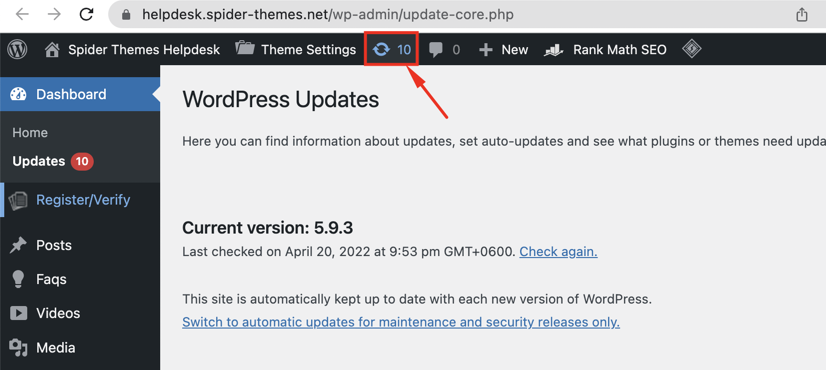
Note: If you don’t see a new update notice on the [direction] Appearance > Themes [/direction] page, click on the Update icon on the top bar to see all the available updates of WordPress. You will find the Update Available Themes at the bottom of that page.
nnnnUpdate icon on the WordPress Admin Dashboardnnnn
Update Using FTP
nnnnnnnn
Login in to your Themeforest account and go to downloads (Dashboard > downloads)
Download the theme into your computer
Install an FTP program (Filezilla is free)
Retrieve your FTP login information from your hosting admin panel and login into your hosting via FTP
Unzip the item main file
Locate the docly.zip file and unzip it. Make sure your unzipping software does not create an extra directory with the same name nested into each other.
Drag and drop the theme main folder into your FTP program with the destination: “YOUR_HOSTING_ROOT/YOUR_SUBDIRECTORY/wp-content/themes/”
FTP program will give a warning that there is an existing with the same directory name, choose to replace all.
It will take varying from 15 to 30 minutes to replace all files. once you did login into your WordPress dashboard and go to master key settings. on the header (besides the master key logo) the theme version will be changed to the latest version. this is the indication that your theme is updated. We recommend method one which only takes less than one minute.
nnnn
Note: You can also upload the new version of the theme to “YOUR_HOSTING_ROOT/YOUR_SUBDIRECTORY/wp-content/themes/” directory with cPanel File Manager. Make sure every time that, you have replaced the old theme with the new version of the theme.
nnnn
Auto Update using Envato WordPress Toolkit
nnnn
Go to themeforest.net > Settings > APIKeys.
Generate an API key and store it in a text file as you will need it shortly.
Now login into your WordPress admin dashboard
From the left sidebar click on Envato Toolkit (If you have not installed it yet read the Plugins Installation section of this documentation)
As shown below screenshot type your username and fill in the API key that you just retrieved from themeforest.net
Save Settings.
Once the page refreshed you should see the list of themes you have purchased.
If there is a new version available you will get the “update Automatically link.
Once clicked, the theme will be updated to the most recent version.
nnnn
Update Through WordPress Admin Panel
nnnn
Navigate to Appearance > Themes Activate another theme to deactivate the theme
Delete the installed the theme
Unzip the file you just downloaded from ThemeForest and locate the WordPress Theme docly.zip
Still within the Themes section, on the header tab, click on “Install Themes”, then on the header second tab click “Upload”.
Click “Browse…” and locate the new theme file docly.zip
In the “Upgrade existing theme?” option choose “Yes” from the dropdown list.
Click “Install Now”.
Click “Activate”.
nnnn
Please note that before updating a theme, we recommend you make a backup of your modified files. Also, we recommend deactivating its current version and then upload the zip file with the new theme version then activate and update the theme.
nnnn
After Update
nnnn
Generally, with every update of the theme there an updated version of the Docly Core plugin required. You must have to install that plugin to get all the changes, improvements that we enlist in the version changelogs. Navigate the Appearance > Install Plugins to check if there updates available for the plugins. Update the Docly Core plugin from there if update available.
A note is a string of text placed at the bottom of a page in a book or document or at the end of a chapter, volume, or the whole text. The note can provide an author’s comments on the main text or citations of reference work in support of the text.
nnnn
Footnotes are notes placed at the bottom of a page. They cite references or comment on a designated part of the text above it. For example, say you want to add an interesting comment to a sentence you have written, but the comment is not directly related to the argument of your paragraph. In this case, you could add the symbol for a footnote.
nnnn
Footnote Tools in Docy
nnnn
You can mention the information reference/resource at the end of the Documentation article with Docy’s Footnote tool. See the Footnote in action-
nnnn
Define Footnotes
nnnn
At the first step, you have to define the Footnotes in the article with the [[reference number=""]] shortcode. Enter the number of the Footnote in the number attribute value. Every Footnote numbers should be unique as like ID.
nnnn
Creating Footnote with Docy
nnnn
You can easily create multi-column Footnotes with Docy. The below steps explains how to create the Footnotes section for your website articles.
nnnn
Go to the Page Edit
Mark the Footnote switcher to Yes from Options :: Doc > Page Settings > Footnote to enable the Footnotes features for that page.
nnnnnnnn
Then the Footnote Options will appear in the Options :: Doc meta box. From there, you can add the Footnote resources of that doc page. Title: Enter the title of the Footnote Reference Number: Enter there the Reference Number of the Footnote that was mentioned in the documentation article with the [[reference number=""]] shortcode. Reference: Write there the referring source with links.
Onepage documentation is a very effective way to demonstrate your product documentation in a handy way. Visitors can find the all guides on a single page and they can navigate through the different sections very fast. You can see the Onepage demo here.
nnnn
OnePage Creating Process
nnnn
Onepage documentation format will generate all the pages of a Doc as sections in a single page which is scrollable by sections. Follow the steps below to create the Onepage documentation easily.
nnnn
Add a New Page from your WordPress dashboard.
There is available a page template called “Onepage Doc”. Select this page template from the Page Attribute metabox.
nnnnnnnn
Then a new metabox will be appeared named “OnePage Configurations”. Input there the Doc ID which you want to make Onepage format documentation. If you don’t know how to find the ID, read this article.
nnnn
Video Tutorial
nnnn
As well as, in this video tutorial I showed the processes how you can create a Onepage documentation template using Docly WordPress theme.
In the video tutorial, you will see the process with the Docly theme. But the processes are same with Docy theme. So you can follow this video tutorial.